Cleaning Dishwasher Filter and Maintenance Guide
Table of Contents
Things You'll Learn From This Article:
- A dishwasher doesn’t clean itself, so ignoring it leads to gritty dishes, cloudy glasses, and bad smells.
- Most dishwasher problems come from buildup inside, not from bad detergent or an old machine.
- The filter at the bottom is the main trouble spot and needs regular cleaning to keep water flowing.
- How often the filter needs attention depends on how much food you leave on dishes before loading.
- Gritty dishes or water pooling in the bottom are signs the filter is overdue for cleaning.
- Warm water and a soft brush are enough for routine filter cleaning; harsh scrubbers can damage it.
- Soaking the filter in warm soapy water with vinegar helps remove slime and stubborn odors.
- Hard water causes mineral scale that can clog filters and spray arms even if they look clean.
- Mineral scale needs acid to dissolve; scrubbing alone won’t remove it.
- Citric acid works better than vinegar for heavy scale and is safe for dishwasher parts.
- Clogged spray arms lead to uneven cleaning, often affecting just the top or bottom rack.
- If spray arms don’t spin freely, debris is likely trapped inside or in the bearings.
- Toothpicks or paperclips are simple tools for clearing blocked spray arm holes.
- Slimy pink or black buildup around door seals is biofilm that wash cycles can’t remove.
- Door gaskets and hidden edges need manual scrubbing with a toothbrush and soapy water.
- Leaving the dishwasher closed all the time encourages mold and bacterial growth.
- Bleach can damage stainless steel interiors, so it must be used carefully or avoided.
- Regular descaling helps prevent cloudy glassware and keeps heating elements working efficiently.
- Many pricey dishwasher cleaner tablets are mostly citric acid, which you can buy cheaply in bulk.
- Persistent odors usually mean rotting food trapped in the filter, drain hose, or air gap.
- Running the garbage disposal before starting the dishwasher helps prevent drain-related smells.
- A clogged air gap near the sink can force dirty water back into the dishwasher.
- A hot empty cycle with vinegar followed by baking soda can reset lingering odors.
- Short weekly checks prevent small issues from turning into expensive repairs.
- Monthly deep cleaning keeps spray arms, filters, and internal surfaces working properly.
- Rubber door seals last longer when cleaned gently and kept free of harsh chemicals.
- Silicone grease, not petroleum jelly, is safe for lubricating dishwasher pump seals.
- Squeaking noises during cycles can mean dry seals that need lubrication.
- “Maintenance-free” filters still need periodic cleaning and descaling.
- Standing water is often caused by a blocked filter, kinked drain hose, or installation mistake.
- A missing disposal knockout plug can completely block dishwasher drainage.
- Humming during draining may mean the drain pump impeller is jammed with debris.
- Clearing a jammed impeller is often a quick DIY fix if done safely.
- Clean internal parts let detergent work the way it’s designed to.
- Regular maintenance improves cleaning results and extends the life of the dishwasher.
Your dishwasher probably works harder than any other appliance in your kitchen. Every cycle, it battles grease, food residue, and hard water minerals on your behalf. And yet, when was the last time you actually cleaned it? Most people assume that a machine designed to clean things must somehow clean itself. Unfortunately, that assumption is wrong.
Here is what actually happens inside your dishwasher. It traps solid particles in filters, accumulates slimy biofilm in hidden crevices, and slowly builds up mineral scale on every hot surface. When your dishes start coming out gritty, your glasses look cloudy, or a weird smell hits you every time you open the door, the problem is rarely the detergent or the machine’s age. Almost always, it is simply neglected maintenance. The good news is that restoring your dishwasher to peak performance does not require a service call. It just requires understanding what is actually going on inside and tackling those accumulation points systematically.
The Critical Role of Filter Maintenance
Understanding that biofilm and scale are the real enemies leads us to the first line of defense: the filter. This component sits at the bottom of your dishwasher’s basin, and its job is to trap food debris that would otherwise recirculate and redeposit on your supposedly clean dishes. When it clogs, water drainage slows, cleaning power drops, and bacteria start throwing a party.
How often you need to clean your filter depends entirely on how you use your machine. If you scrape your dishes thoroughly before loading, monthly cleaning is probably sufficient. But if you rely on the dishwasher to handle significant food residue, or if you run heavy loads daily, weekly inspection is wise. The telltale signs that you have waited too long include dishes that feel gritty after washing and water that pools in the bottom of the machine instead of draining completely.
Removing the filter is usually straightforward. Most designs involve a simple twist-and-pull motion, though some models require unscrewing a retaining cap. Once you have it out, rinse it under warm running water to clear the loose debris. For the stubborn biological slime and calcium deposits that rinsing cannot touch, use a soft brush dedicated specifically to this purpose. Avoid wire brushes or harsh scouring pads because they can tear the delicate mesh, creating holes that let debris through.
When the filter has developed persistent odors or heavy biofilm, a soak helps tremendously. Place it in warm soapy water with a splash of vinegar for fifteen to twenty minutes. This seemingly simple maintenance step alone resolves approximately 80% of common dishwasher complaints.
The Bottom Line Your dishwasher filter traps debris that would otherwise recirculate onto clean dishes. Clean it weekly to monthly depending on usage. A clogged filter is the root cause of most performance problems.
The Chemistry of Hard Water and Filter Blockages
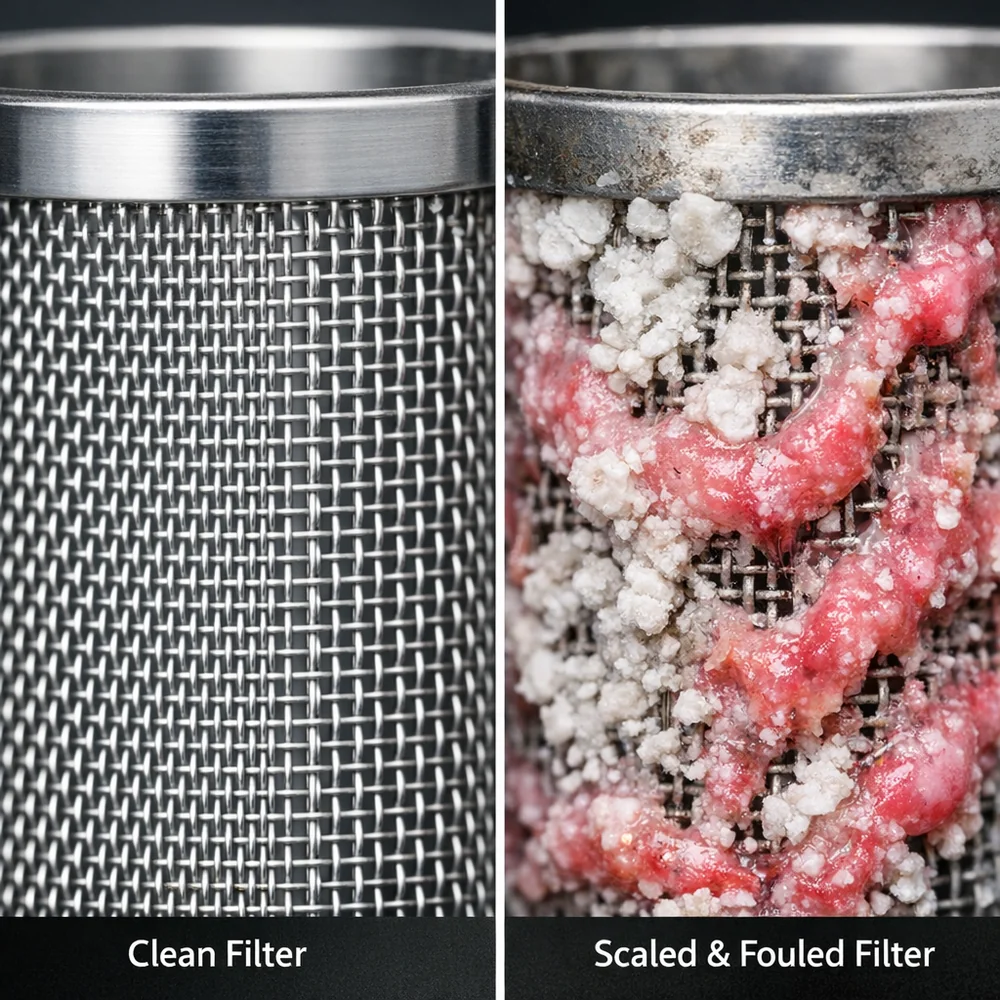
If you live in an area with hard water, your filter faces an enemy far more persistent than leftover food: calcium carbonate scale. Hard water contains high concentrations of dissolved calcium and magnesium, and these minerals behave in a counterintuitive way. Unlike most substances that dissolve better in hot water, calcium carbonate exhibits inverse solubility, meaning it becomes less soluble as temperature rises.
Think about what this means for your dishwasher. The very act of heating water to sanitize your dishes forces dissolved minerals to precipitate out and solidify onto hot surfaces. Your filter’s fine mesh provides the perfect structure for this crystallization. Over time, microscopic scale crystals weave themselves into the filter material, creating a rock-hard barrier that looks transparent but blocks water flow almost completely.
Mechanical cleaning cannot remove this kind of buildup. You need chemical descaling, which means using an acidic solution to break the calcium carbonate bonds. The acid reacts with the mineral deposits, releasing carbon dioxide gas (those bubbles you see) and leaving behind water-soluble calcium salts that rinse away easily.
While vinegar (acetic acid) is a popular home remedy, it is relatively weak for serious scale buildup. Citric acid offers a more potent, targeted approach that dissolves carbonate buildup without damaging the stainless steel mesh. When your filter is clogged with scale, the pump is essentially starved of water. Spray pressure drops dramatically, and what should be a powerful jet becomes nothing more than a weak trickle.
The Bottom Line Hard water minerals precipitate out onto hot surfaces, clogging filters with invisible scale. Acidic descaling with citric acid or vinegar dissolves this buildup chemically, restoring water flow.
Diagnosing and Cleaning Spray Arms
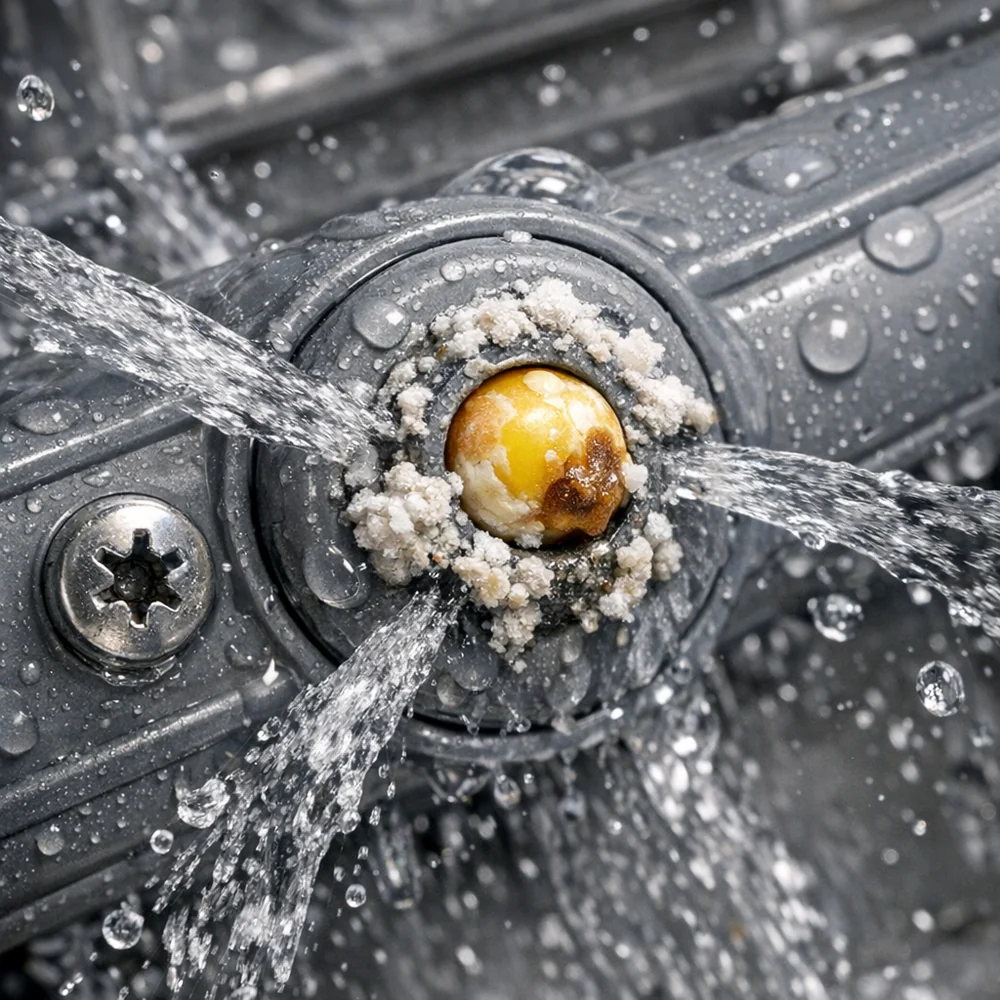
With filters addressed, the next logical checkpoint is where that filtered water actually goes: the spray arms. These spinning arms distribute water throughout your dishwasher, relying on dozens of tiny nozzle holes to create the high-velocity jets that blast food off your dishes. Those nozzles clog surprisingly easily with seeds, bone fragments, mineral scale, and even paper labels that slip off jars.
The symptoms of clogged spray arms show up in specific patterns. If your top rack consistently comes out dirty while the bottom rack is spotless, the upper spray arm or its feed tube is probably blocked. Conversely, dirty items only on the bottom suggest a lower arm problem. You can also manually rotate the arms by hand; they should spin freely. Any stiffness indicates debris trapped in the bearing mount.
Cleaning requires removing the arms, which is typically as simple as unscrewing a plastic nut or releasing a locking clip. Once removed, shake the arm to see if anything rattles inside. A rattling sound usually means hard objects like seeds or glass fragments are trapped in the interior. Shake them out through the inlet opening.
Next, inspect each nozzle individually. A toothpick or straightened paperclip works perfectly for dislodging blockages. For mineral scale that has formed inside the nozzles, soak the entire spray arm in a 50/50 vinegar and water solution for about thirty minutes. The acid dissolves the calcium deposits, and you can rinse away the residue. Just make sure to flush the arm thoroughly before reinstalling so no vinegar remains inside to interfere with your detergent during the next cycle.
The Bottom Line Spray arm nozzles clog with debris and mineral scale, causing uneven cleaning. Remove the arms periodically, clear each nozzle with a toothpick, and soak in vinegar to dissolve scale.
Biofilm and Bacterial Growth
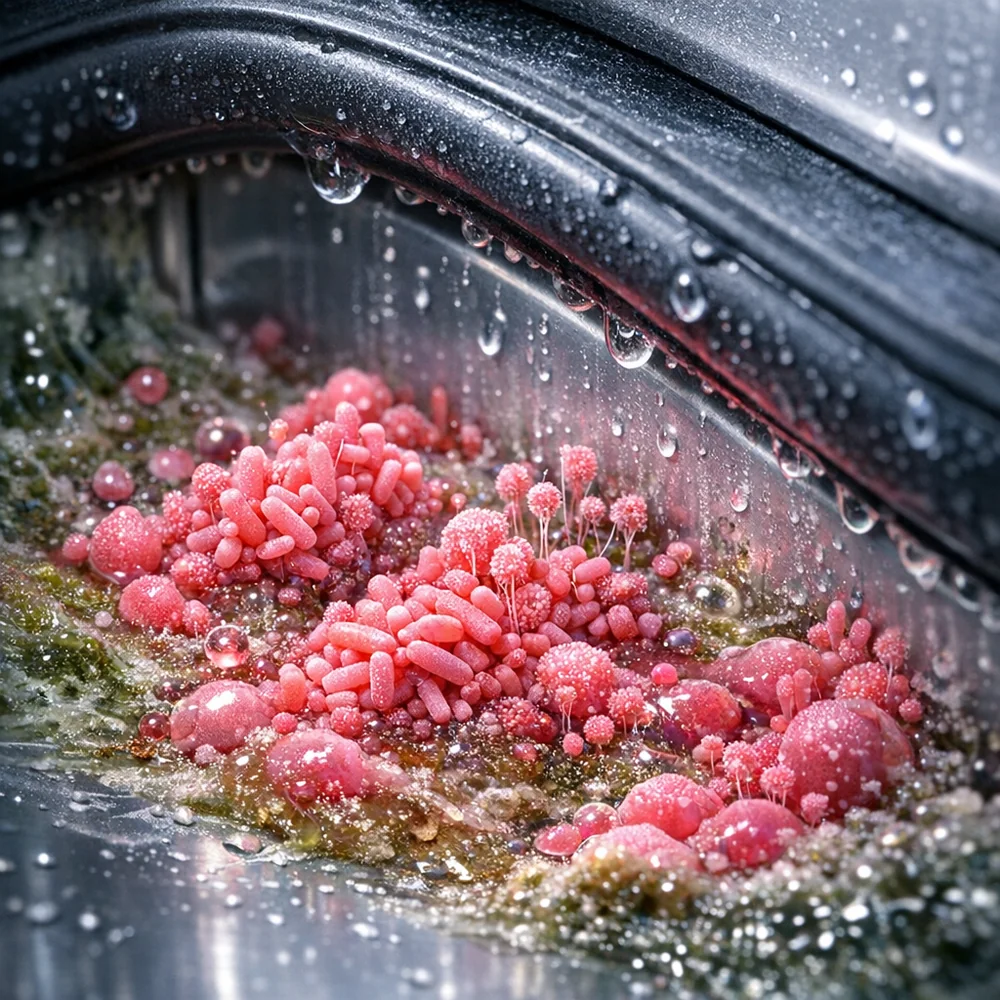
Spray arms deliver water to your dishes, but there are places inside your dishwasher that those spray arms never reach. These “shadow zones,” particularly around the door gasket and the bottom edge of the door, create the warm, moist, dark environment that fungi and bacteria love. Research has shown that rubber seals and gaskets frequently host black mold and bacterial growth, especially in machines that are closed immediately after cycles.
You have probably seen this growth without realizing what it was. Biofilm appears as a pinkish or black slime, often tucked under the rubber gasket or along the door’s bottom edge where water splashes but jets do not reach. This slime is not just gross; it is a protective structure that shields bacterial colonies from detergent action. Standard wash cycles simply cannot clean these areas because the spray pattern does not cover them.
Manual scrubbing is the only effective solution for established biofilm. An old toothbrush dipped in hot soapy water navigates the crevices of door seals and detergent dispensers effectively. Pay special attention to the bottom edge of the door, which is notorious for accumulation and often invisible unless you crouch down to look.
Bleach provides powerful sanitization for stubborn mold, but use it with caution. Never put bleach in a dishwasher with a stainless steel interior because it causes permanent pitting and corrosion. For plastic-tub machines, a carefully measured bleach cycle can kill mold effectively. However, for regular maintenance, vinegar offers a safer, non-corrosive alternative that handles most biofilm without risk to your machine’s components.
The Bottom Line Biofilm grows in “shadow zones” that spray arms cannot reach, particularly door gaskets. Manual scrubbing with a toothbrush is the only effective removal method. Clean these areas monthly.
Descaling Hard Water Deposits
Biofilm is a biological problem, but hard water is a chemical one, and it impacts your dishwasher far beyond just the filter. Calcium and magnesium carbonate scale deposits on interior surfaces, roughening them and giving bacteria more places to anchor. Scale also accumulates on heating elements, reducing their efficiency and forcing longer cycles to reach target temperatures.
Citric acid is the gold standard for whole-machine descaling. Unlike vinegar, which can degrade rubber seals with prolonged or repeated exposure, citric acid attacks mineral deposits aggressively while remaining safe for all machine components. To descale, simply run an empty cycle with three to four tablespoons of citric acid crystals placed in the detergent cup. The acid dissolves scale throughout the system as Water circulates.
Many commercial dishwasher cleaner tablets rely on citric acid as their primary active ingredient. Understanding this chemistry means you can purchase generic citric acid in bulk rather than paying premium prices for branded single-use cleaners. The cleaning power is identical; only the packaging and marketing differ.
Regular descaling also prevents the cloudy film on glassware that often leads people to blame their detergent. When spray nozzles and heating elements operate free from scale, the machine maintains the temperature and pressure dynamics it was engineered to deliver. The detergent works as intended, and your glasses come out sparkling.
The Bottom Line Run an empty cycle with citric acid monthly to dissolve scale from heating elements and spray nozzles. This maintains cleaning power and prevents cloudy deposits on glassware.
Dealing with Odors
Descaling and biofilm removal address the causes of most dishwasher smells, but persistent odors that remain despite these steps usually signal trapped organic matter decomposing somewhere in the drainage path. The filter is the primary suspect, but other culprits include the garbage disposal connection and the air gap.
The drain hose connecting your dishwasher to the garbage disposal can retain food sludge if the disposal is not run frequently. This trapped material decomposes, sending smells back up into the dishwasher. The solution is simple: run your garbage disposal with plenty of water immediately before starting the dishwasher. This clears the drainage path and ensures waste water can exit freely.
If water pools in the basin despite a clean filter, check your air gap. This is the small cylinder typically mounted next to your sink faucet. A clogged air gap forces waste water back into the dishwasher, bringing odors and dirty water with it. Remove the cap, clear any debris, and test the drainage again.
For lingering smells that survive all these checks, a “sanitization bomb” can help reset everything. Place a bowl of white vinegar on the top rack of your empty dishwasher and run a hot cycle. The vinegar steam permeates the entire interior, killing bacteria throughout. Follow this with a sprinkle of baking soda across the bottom of the tub and run a short rinse cycle. The baking soda neutralizes any remaining acidic odors, leaving your machine smelling fresh.
The Bottom Line Persistent odors usually indicate trapped organic matter in the drain hose or air gap. Clear these paths, then run a vinegar cycle followed by baking soda to neutralize smells.
Maintenance Schedule at a Glance
Knowing what to do is only useful if you actually do it. Establishing a routine prevents small problems from becoming expensive failures. Here is what a proactive maintenance schedule looks like for most households.
Weekly maintenance takes just a few minutes. Inspect and rinse your mesh filter under running water. Wipe down the door gasket and bottom seal with a damp cloth. Manually spin the spray arms to confirm they rotate freely without grinding or resistance.
Monthly maintenance goes deeper. Remove the filter and scrub it with a dedicated brush to clear any biofilm or scale that rinsing misses. Run an empty cycle with vinegar or citric acid for descaling. Inspect each spray nozzle for blockages and clear any you find with a toothpick.
Quarterly maintenance addresses components that accumulate problems more slowly. Remove and fully clean the spray arms, soaking them if scale is present. Check the drain hose under the sink for kinks or blockages that might restrict flow. Inspect your dish racks for damaged coating; exposed metal can rust and stain your dishes.
The Bottom Line Weekly: rinse filter, wipe gasket, check spray arms. Monthly: deep clean filter, descale with citric acid, clear nozzles. Quarterly: remove spray arms, check drain hose, inspect racks.
Seal and Gasket Care
The previous sections addressed cleaning, but rubber seals need protective maintenance too. Door gaskets eventually dry out and crack, leading to leaks that can damage your flooring and cabinetry. Harsh chemicals, including excessive vinegar or bleach exposure, accelerate this deterioration.
Clean your gaskets with mild soap and water rather than abrasive chemical cleaners. A soft cloth or sponge is all you need. After cleaning, some manufacturers suggest applying a very light coat of food-grade silicone grease to keep the rubber supple, though simply keeping them clean is usually sufficient.
Watch for mold that has penetrated the silicone material itself. Surface mold wipes away easily and disappears with routine cleaning. But mold that has grown into the gasket’s structure creates permanent discoloration and weakening. In these cases, the only solution is replacing the gasket entirely. Catching mold early with regular cleaning prevents reaching this point.
The Bottom Line Clean door gaskets with mild soap to prevent deterioration. Surface mold wipes away; deep mold in the rubber structure requires gasket replacement. Regular cleaning prevents permanent damage.
Pump Seal Lubrication and Maintenance
Deep within your dishwasher’s mechanics lies a component most people never think about: the pump seal. This critical part prevents water from leaking into the motor assembly, and it operates in one of the harshest environments imaginable. High heat, alkaline detergent chemicals, and constant friction all take their toll.
Over time, pump seals can dry out or accumulate detergent residue. When this happens, friction increases and the motor has to work harder. If you hear a squeaking noise during the wash cycle, especially early in the cycle before everything is fully wet, you are likely hearing a dry seal complaining.
The maintenance solution is food-grade silicone grease. This is critically important: never use petroleum-based lubricants like Vaseline, which swell and destroy rubber. Pure silicone grease is inert and water-resistant, making it perfect for this application. To access the seal, you typically need to remove the filter assembly and look for a small plastic cover in the sump area. A small dab of silicone grease applied to visible rubber O-rings or seals restores pliability and creates a hydrophobic barrier against mineral buildup.
This simple maintenance step can extend the life of your circulation pump by years. It prevents one of the most common failure modes: a leaking seal that allows water to rust out the motor bearings. Ten minutes of preventive maintenance beats a three-hundred-dollar repair call.
The Bottom Line Pump seals dry out over time, causing squeaking and eventual failure. Apply food-grade silicone grease periodically to keep seals supple and prevent motor damage. Never use petroleum-based lubricants.
Understanding Maintenance-Free Filters
Some newer dishwashers advertise “maintenance-free” filters. These systems typically include a hard food disposer, essentially a mini grinder built into the pump assembly that pulverizes food particles so they wash down the drain. The appeal is obvious: no manual filter cleaning.
However, even these systems are not truly maintenance-free. The grinder screen can still clog with non-food debris like plastic wrap fragments, twist ties, or bone chips that are too tough to pulverize. When this happens, you get the same symptoms as a clogged traditional filter: poor cleaning, pooling water, and bad smells.
Additionally, self-cleaning systems cannot address biofilm or mineral scale. The grinder handles solid debris but does nothing about the slime in your door gasket or the calcium coating your heating element. Monthly empty cleaning cycles with citric acid or vinegar remain necessary regardless of filter type. Check your machine’s manual for specific guidance on maintenance requirements for self-cleaning systems.
The Bottom Line “Maintenance-free” filters still require monthly descaling cycles and gasket cleaning. The grinder handles food debris but cannot address biofilm or mineral scale.
Troubleshooting Drainage Issues
Standing water in the bottom of the dishwasher tends to create panic, but the cause is usually simple. Before calling a plumber, work through the obvious culprits systematically.
Start with the filter. A completely blocked mesh prevents the pump from moving water at all. Even if you cleaned it recently, check again. Food debris can accumulate surprisingly fast in heavy-use households.
Next, crawl under the sink and inspect the drain hose path. A heavy item in the cabinet can pinch the flexible hose, restricting flow. Also confirm that the “high loop” installation is intact: the drain hose should loop up to touch the underside of the counter before descending to connect to the drain. This prevents sink water from backflowing into the machine.
If your dishwasher connects to a newly installed garbage disposal, there is one more possibility. Disposals ship with a plastic “knockout plug” blocking the dishwasher inlet. Installers are supposed to remove this plug, but it is commonly overlooked. If nobody remembers removing it, your dishwasher literally cannot drain into the disposal. A quick check saves a service call.
The Bottom Line Standing water usually indicates a clogged filter, pinched drain hose, or missing high loop. For new disposals, verify that the knockout plug was removed during installation.
Deep Dive: Cleaning the Drain Pump Impeller
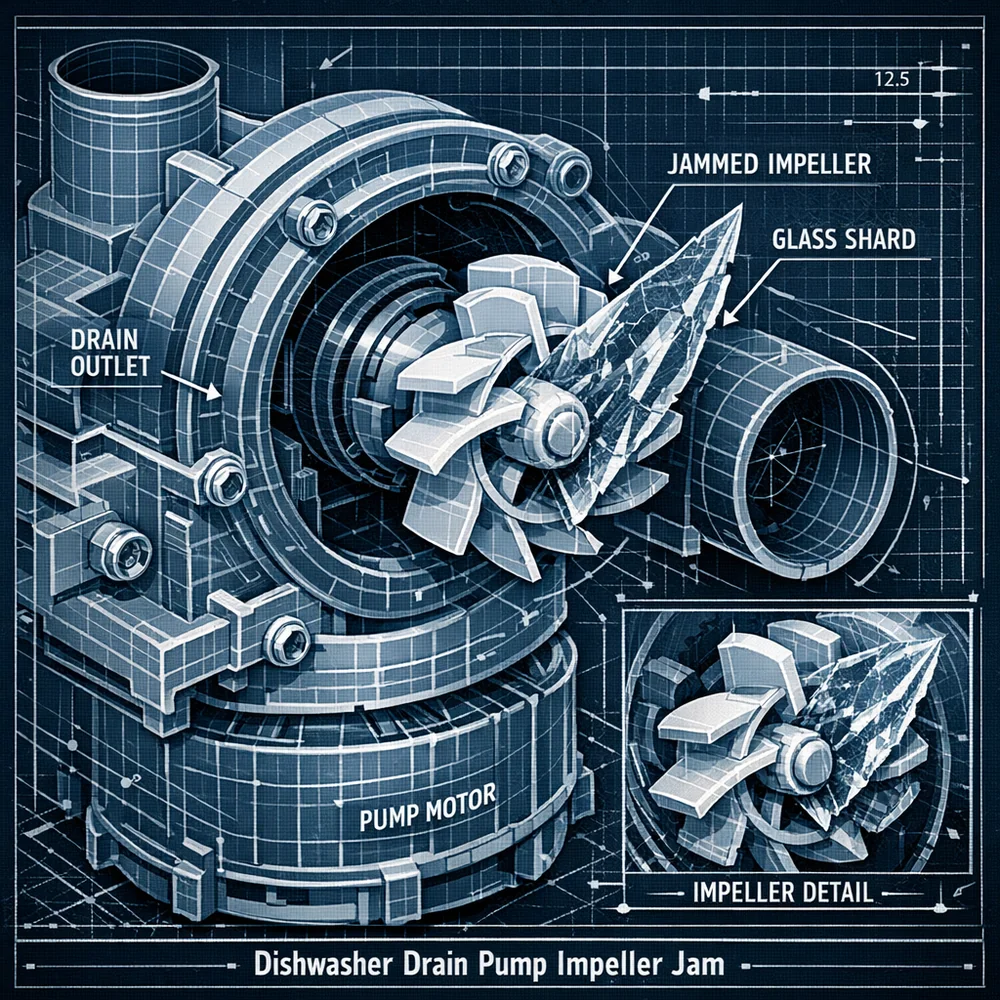
When descaling and you hear a loud humming or grinding noise during the drain cycle, or if standing water remains despite a clean filter and clear drain path, the problem is likely a jammed drain pump impeller. This small rotating fan blade pushes water out of the machine, and it is surprisingly easy to jam.
Small hard objects, broken glass shards, popcorn kernels, cherry pits, or bits of plastic, can slip past the main filter and lodge themselves in the impeller chamber. The pump motor tries to spin but cannot, creating that characteristic humming sound as it fights the obstruction. If left unaddressed, the motor overheats and burns out.
Clearing the impeller is an advanced but very manageable DIY task. Safety comes first: unplug the dishwasher or flip the circuit breaker. Then remove the bottom rack, spray arm, and filter assembly. In the sump area, you will typically find a small plastic cover held by a screw or clip. Remove it to reveal the impeller blades.
Use a flashlight to inspect for debris, and tweezers to carefully extract any foreign objects. Do not use your fingers because glass shards are extremely common here. Once clear, flick the impeller blade with a tool. It should spin with a magnetic “bounciness” but without any grinding sensation. Reassemble everything and test. What would have been a costly service call becomes a fifteen-minute fix.
The Bottom Line A humming drain pump usually means a jammed impeller, not a dead motor. Clear debris carefully with tweezers, especially after glass breakage. This DIY fix prevents expensive pump replacement.
Connecting Cleanliness to Performance
Everything covered so far, filter maintenance, descaling, biofilm removal, spray arm cleaning, connects to a single outcome: restoring your dishwasher’s ability to do its job. A clean dishwasher cleans better. When spray arms rotate freely, water reaches target temperatures, and drains flow without restriction, the machine operates exactly as its engineers intended.
This relationship extends to detergent efficiency as well. Dishwasher detergent pods and powders rely on specific water conditions to dissolve and activate their cleaning enzymes. Dirty recirculating water, contaminated by debris from a clogged filter, interferes with this chemistry. Your expensive pods cannot perform when they are fighting against the machine instead of working with it.
The time you invest in maintenance pays dividends not just in cleaning performance but in appliance longevity. A well-maintained dishwasher lasts years longer than a neglected one. Pumps do not burn out fighting restrictions. Seals do not fail prematurely from chemical degradation. Heating elements do not labor under layers of insulating scale. The small, regular effort prevents the large, sudden repair bill.
The Bottom Line Proper maintenance lets your dishwasher and detergent work as designed. Clean machines last longer and clean better. Small, regular effort prevents expensive repairs.
References
- Whirlpool Corporation. Dishwasher Filter Maintenance Guidelines.
- International Journal of Food Microbiology. Dishwasher Biofilm Research.
- Consumer Reports. Appliance Maintenance Best Practices.
- Journal of Applied Microbiology. Fungal Contamination in Household Appliances.
- GE Appliances. Spray Arm Cleaning Instructions.
- Journal of Water Process Engineering. Calcium Carbonate Scaling Kinetics.
- Appliance Repair Journal. Pump Seal Failure Modes and Lubrication Protocols.