Mopping Hygiene Mistakes: Managing Greywater and Surface Residues
Table of Contents
Things You'll Learn From This Article:
- Using one bucket to mop just moves dirty water around; separating clean water from rinse water actually pulls dirt off the floor.
- Rinsing the mop in plain water before dipping it back into clean solution keeps you from reapplying old grime.
- When mop water turns cloudy, it’s no longer cleaning and needs to be changed.
- A floor that looks clean but dries cloudy usually has a thin layer of dirt left behind.
- Sticky or footprint-marked floors are a sign of too much detergent, not too little.
- Measuring detergent matters; eyeballing it often leads to soap buildup that attracts more dirt.
- Plain warm water or water with a little vinegar helps remove old soap residue.
- Cleaning dirt off a floor and killing germs are different steps; disinfectants don’t work well on dirty surfaces.
- Disinfecting only makes sense after the floor is already clean and the product is left wet for the required time.
- Mop heads need machine washing at high heat to actually get sanitary.
- Fabric softener ruins microfiber’s ability to grab dirt, so it should be skipped.
- A mop that smells musty is already contaminated and spreading germs.
- Fully drying mop heads after washing is key to preventing bacteria and mold.
- Flat microfiber mops trap fine dirt better, while spin mops handle hair and heavy debris more easily.
- Using a fresh mop pad for each room helps keep bathroom germs out of kitchens and living spaces.
- Mop heads wear out over time and clean worse even if they look fine.
- Replacing worn mop pads regularly saves effort and improves results.
- Storing mops with airflow, preferably hanging, prevents mildew from forming.
- Leaving a wet mop in a bucket or corner quickly turns it into a breeding ground for mold.
- A mop should never have a noticeable odor; smell alone is a sign it’s time to replace it.
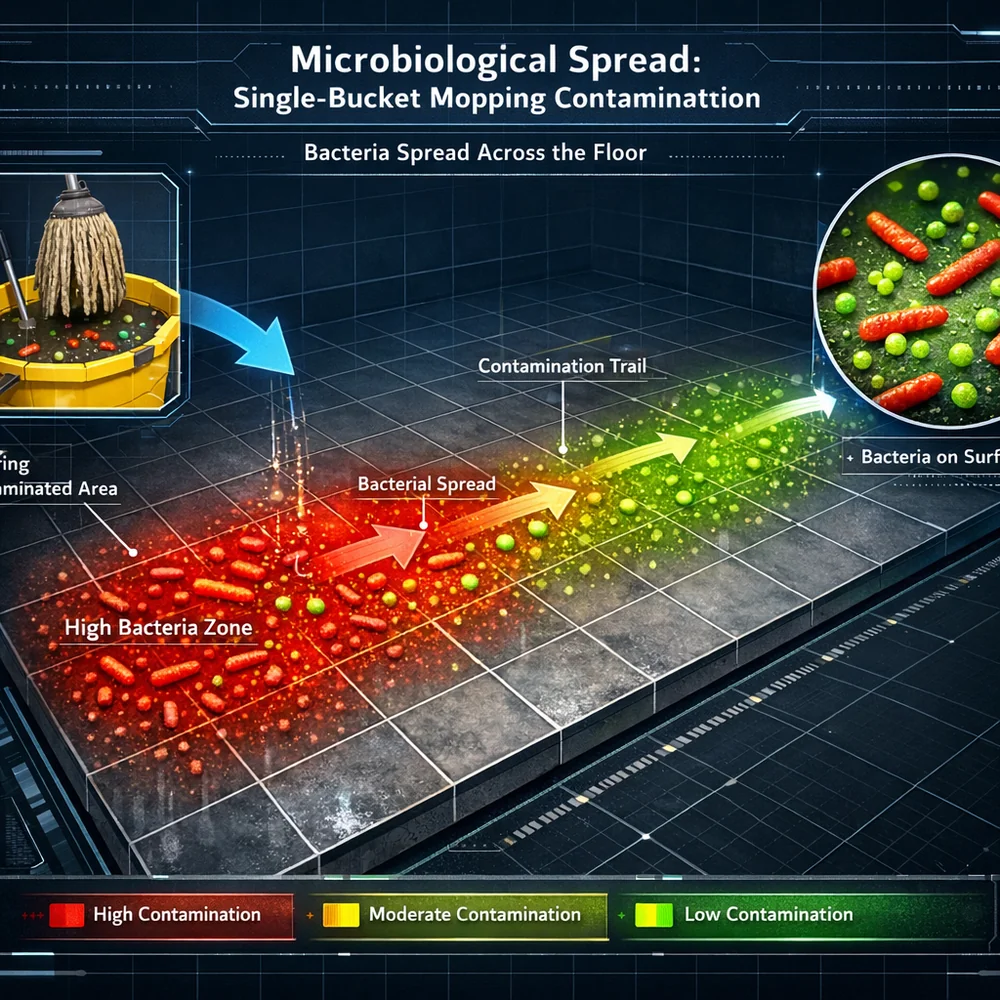
Here’s an uncomfortable truth about how most people mop: they’re spreading dirty water around rather than actually cleaning the floor. When you dip a mop into a single bucket, wring it out, mop a section, then dip it back into the same bucket, you’re just diluting the dirt and redistributing it. Within minutes, that “cleaning” water becomes a gray slurry of everything you just pulled off the floor.
Every subsequent dip recontaminates the mop fibers with the dirt you already removed.
This creates what professionals call greywater redeposition. Your mop becomes a transfer vehicle that spreads a thin layer of diluted grime across the entire floor. When it dries, you’re left with a surface that looks clean but is actually coated in a film of suspended particles. This guide covers the real science of effective mopping, from the two-bucket method that actually works to proper mop head sanitization and preventing that sticky feeling from detergent buildup.
The Two-Bucket Method: How Professionals Mop
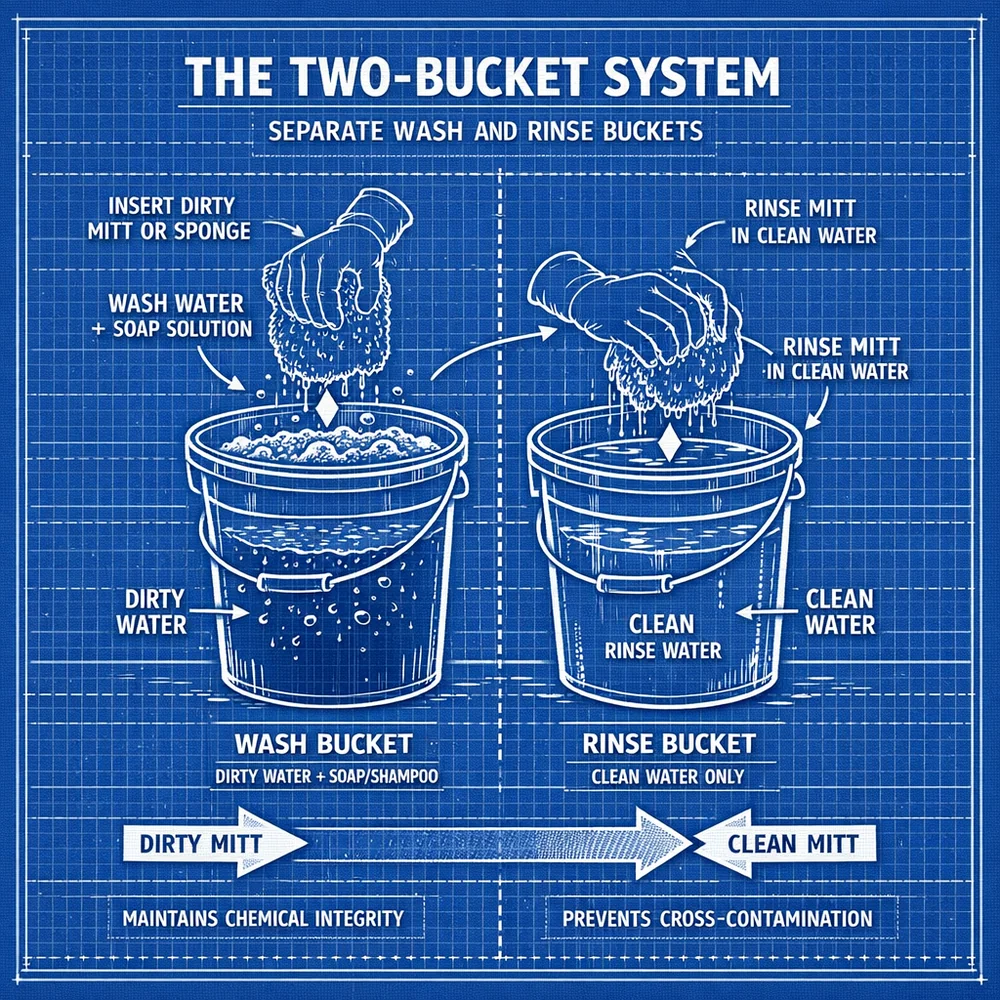
The single biggest upgrade you can make to your mopping routine is switching from one bucket to two. Professional cleaning services have used this method for decades because it actually removes dirt instead of just moving it around. The system is simple: one bucket holds fresh cleaning solution, the other holds plain rinse water.
The operational sequence prevents cross-contamination between dirty and clean water.
Start by dipping your mop into the clean solution bucket and mopping a section of floor. When the mop is visibly dirty, rinse it thoroughly in the plain water bucket. Wring it out well, then dip back into the clean solution for the next section. All the heavy soil stays trapped in the rinse bucket while your cleaning solution stays potent.
The physics here is straightforward: by isolating the bulk waste in one bucket, you maintain the chemical effectiveness of your surfactant in the other. Once water gets cloudy with suspended dirt, it can’t hold more soil in suspension. It becomes saturated and starts redepositing. The two-bucket method turns mopping into a one-way extraction process.
Key Insight: Single-bucket mopping redistributes suspended particulates and bacteria across the floor surface. Implementing a two-bucket system isolates the waste stream from the fresh cleaning solution, ensuring a “one-way” extraction of contaminants rather than their mechanical redistribution.
Sanitizing Your Mop Head Properly
With the two-bucket method covered, let’s talk about what happens after you’re done mopping. Your mop head is a persistent reservoir for household pathogens if you don’t sanitize it properly. Whether you’re using cotton strings or microfiber pads, the dense fiber structure creates a moist environment where bacteria and mold thrive. Just rinsing under the tap isn’t enough.
A mop that smells musty has already become a contaminated tool that spreads rather than removes germs.
The gold standard for mop head maintenance is machine laundering at high temperature. For most durable materials, wash at a minimum of 60 degrees Celsius. This thermal energy is sufficient to denature viral proteins and break down bacterial cell walls. For microfiber pads specifically, skip the fabric softener because it coats the fine fibers and destroys their capillary action. Reference our microfiber cloth care guide for more details.
Wash mop heads in their own dedicated load to prevent cross-contamination with family clothes. Add a double rinse cycle to ensure all detergent residues are removed. After washing, dry completely either in a dryer on medium heat or by air-drying in direct sunlight, which provides bonus UV sanitization.
Key Insight: Mop heads act as microbial sinks and require high-temperature laundering (60°C+) and oxidative boosters to achieve true sanitization. Separating mop loads from general laundry and ensuring rapid post-wash desiccation prevents the implement from becoming an active vector for household pathogens.
Why Floors Look Cloudy After Mopping
One clear sign of poor mopping technique is when your floor looks cloudy or streaky after it dries. This happens when the mop becomes so saturated with suspended dirt that it can’t absorb anymore. Instead of picking up soil, it starts leaving behind a thin layer of gray particles that show up once the water evaporates.
This greywater redeposition makes your floor look dirtier after cleaning than before.
The solution is changing your water as soon as it starts looking cloudy. A good rule of thumb is to change the water every 300 square feet or so, depending on how dirty the floor is. Using distilled water for the final mopping pass can also significantly reduce redeposition since it eliminates mineral content that contributes to film formation.
Modern microfiber flat mops are much better at trapping dirt through electrostatic attraction, making them less likely to redeposit soil compared to traditional cotton string mops. In high-sanitation environments, using a fresh pad for each room is the ultimate defense against cross-contamination.
Key Insight: Greywater redeposition occurs when cleaning solution exceeds its soil-saturation limit, leaving a film of particulates after evaporation. Changing water at the first sign of turbidity and utilizing the superior trap-and-hold mechanics of microfiber prevents this “secondary-soiling” effect.
The Sticky Floor Problem: Too Much Soap
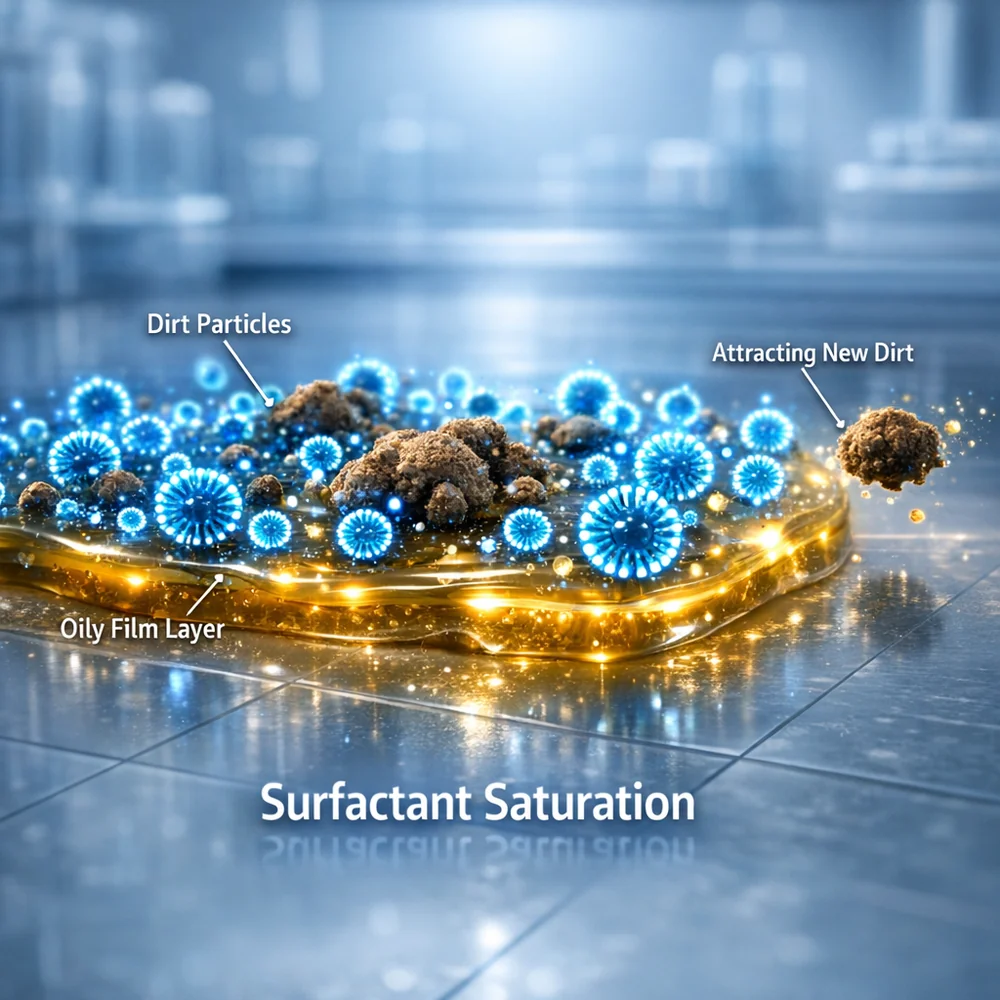
If your floor feels tacky or shows footprints after drying, you’re probably using too much detergent. Most people assume more soap means cleaner floors, but modern surfactants are powerful at very low concentrations. When you use too much, the water evaporates but the soap stays behind as a sticky film.
This chemical residue actually attracts and holds new dirt, making your floor get dirtier faster.
Over time, layers of soap buildup accumulate and make floors look dull regardless of how often you clean. This is especially noticeable on natural stone surfaces and high-gloss tiles. To remove existing buildup, mop with plain warm water mixed with a splash of white vinegar. The acidity helps break down the alkaline detergent film.
Prevention is about precise measurement. Always follow the manufacturer’s dilution ratios exactly. If the bottle says one cap per gallon, don’t eyeball it since use an actual measuring cap. If you can see your footprints on a freshly cleaned floor, that’s a sign of residue. The goal isn’t to apply a chemical coating but to use chemistry for dirt removal.
Key Insight: High-concentration surfactants leave a tacky residue film that traps new soil and creates a dull, streaky finish. Adhering to precise dilution ratios and utilizing “pre-spray” mopping techniques prevents the accumulation of these sticky chemical layers.
Cleaning vs. Disinfecting: They’re Different
Here’s a critical distinction that many people miss: cleaning and disinfecting are two separate processes that work differently. Cleaning is the mechanical removal of visible dirt and biological matter from a surface. Disinfecting is the chemical killing of pathogens. For most everyday situations, cleaning with a neutral detergent is sufficient.
You don’t need to disinfect your floors every time you mop unless there’s been illness or a specific contamination.
The problem with trying to disinfect a dirty floor is that it doesn’t work. If the surface is covered in grease or grime, disinfectant molecules react with that soil instead of reaching the bacteria underneath. They’re effectively shielded. For a disinfectant to be effective, the floor must be mechanically cleaned first.
When you do need to disinfect, use products like hydrogen peroxide applied to an already-clean surface. Let it dwell for the time specified on the label while the surface stays wet. Quick spray-and-wipe applications are largely ineffective at killing resilient pathogens.
Key Insight: Disinfection cannot occur on a soiled surface; soil “shields” pathogens from chemical contact. Effective sanitization requires a two-stage protocol where a mechanical clean is followed by a disinfectant application with sufficient “dwell time” to achieve a clinical kill-rate.
Spin Mops vs. Flat Mops: Which Is Better
The spin mop versus flat mop debate usually focuses on convenience, but there are real performance differences worth understanding. Spin mops feature a circular head with a centrifugal wringing mechanism that’s excellent at removing excess water. This makes them great for surfaces sensitive to moisture like hardwood floors.
Flat mops with rectangular heads provide better surface contact and integrate more easily into a multi-pad routine.
The flat geometry means 100 percent of the pad contacts the floor during each stroke, versus the more variable contact of a round spin mop head. Flat mops are also simpler to swap out, which supports using a fresh pad for each room or zone. This is the most effective way to prevent cross-contaminating your bathroom germs into your kitchen.
From a dirt-trapping perspective, flat microfiber pads generally capture finer particles than the stringy fringe of a spin mop. However, spin mops handle large debris like hair and heavy grit more effectively. The best choice depends on your specific cleaning challenges and floor types.
Key Insight: Flat mops provide superior surface-area contact and facilitates a “clean-pad-per-room” routine to eliminate cross-contamination. Spin mops utilize centrifugal action to manage moisture levels, making them better suited for high-load “bulk” cleaning on water-sensitive surfaces.
When to Replace Your Mop
Even with perfect sanitization, mop heads have a limited lifespan. As fibers get stressed through use and washing, they break down at a molecular level. Microfiber filaments fray and lose their electrostatic properties. Cotton fibers become limp and lose absorbency. A worn-out mop requires more effort while delivering worse results.
For high-use areas, replace microfiber pads every 50 to 100 wash cycles.
If the pad feels thin or starts leaving streaks, that’s fiber failure. Cotton string mops should be replaced even more frequently since natural cellulose is prone to permanent rot. Reference our cleaning tools guide for more on tool lifecycle management.
A good approach is maintaining a rotation of four or five pads so no single one gets fatigued by back-to-back use. This also allows for segregation by zone: use one color for bathrooms, another for kitchens. A fresh mop head extracts approximately 50 percent more soil than a worn one. The cost of regular replacements is minimal compared to the cleaning performance you gain.
Key Insight: Mechanical and chemical fatigue compromise the soil-extraction capacity of all mop fibers over time. Replacing microfiber pads every 50-100 washes and cotton heads quarterly ensures that the “active surface” of the tool remains in peak functional condition.
Preventing Mop Mildew
That sour smell coming from your mop is the growth of anaerobic bacteria and mold, a biological indicator of serious contamination. This happens when a wet mop gets stored in a way that prevents airflow. Leaving it in the bucket or tucking it in a corner creates an incubator where organic matter ferments and mold colonies bloom within hours.
A clean mop should never have a discernible smell.
The prevention is simple: always store mops with effective airflow. Wall-mounted racks that hold the handle vertically with the head down are ideal. Gravity helps water drain away from the fibers while air circulates around all surfaces. For string-style mops, shake them out vigorously after use to separate the strands and speed drying.
If possible, dry sanitized mop heads outside in direct sunlight. UV rays provide secondary sanitization, and the sun’s warmth accelerates moisture evaporation. Desiccation is the enemy of microbes and the friend of hygiene. Once a mop develops that musty odor, it’s usually past saving and needs replacement.
Key Insight: Storing damp mops in unventilated areas promotes the anaerobic growth of mildew and bacteria. Implementing “vertical hang-storage” and utilizing solar-assisted air drying ensures rapid desiccation, permanently suppressing the formation of foul odors and pathogenic hubs.
Conclusion
Effective floor mopping is more technical than most people realize. The single-bucket method that feels intuitive actually redistributes dirt rather than removing it. Switching to a two-bucket system separates your waste stream from your cleaning solution, turning mopping into a one-way extraction process. Change the water when it gets cloudy and use precise detergent dilutions to prevent sticky residue buildup.
Your mop head needs proper care too. Machine wash at high temperature, skip the fabric softener for microfiber, and always dry thoroughly before storage. Store mops vertically with good airflow to prevent mold growth. Replace worn pads regularly since a tired mop works harder and cleans worse.
Understand the difference between cleaning and disinfecting. Most daily mopping just needs good mechanical soil removal. When you do need to disinfect, clean first, then apply disinfectant to the already-clean surface with proper dwell time. These science-based protocols transform casual floor-wetting into genuine hygiene.
References
- Scott, E., & Bloomfield, S. F.
(1990). “The Survival and Transfer of Microbial Contamination via Cleaning Cloths and Mops.” Journal of Applied Bacteriology. 2.
International Fabric Institute. (2015). “The Physics of Soil Suspension: Bucket Dynamics and Greywater Management.” IFI Technical Bulletin.
- 1-12. 3.
Smith, J. A., et al. (2011).
“Chemical Build-up on Domestic Hard Surfaces: The Impact of Surfactant Concentration.” Journal of Cleaning Science. 4. World Health Organization (WHO).
(2019). “Best Practices for Environmental Cleaning: Disinfection of Floor Surfaces in Shared Spaces.” WHO Technical Guidance. 5.
U.S. Environmental Protection Agency (EPA). (2020). “Evaluating the Efficacy of Mopping Systems in Pathogen Reduction.” EPA Technical Bulletin.